Review: Christmas Toys Embroidery Design
As a designer who has spent countless hours hooped up at the machine, I have learned that not every festive graphic translates well into thread. We have all been there: you find a cute digital illustration, convert it or buy a pre-digitized file, and hope for the best. More often than not, the result is a puckered mess or a design that loses its charm under the needle. That is why I approach new machine embroidery design releases with a healthy dose of skepticism and a stack of scrap fabric ready for testing.
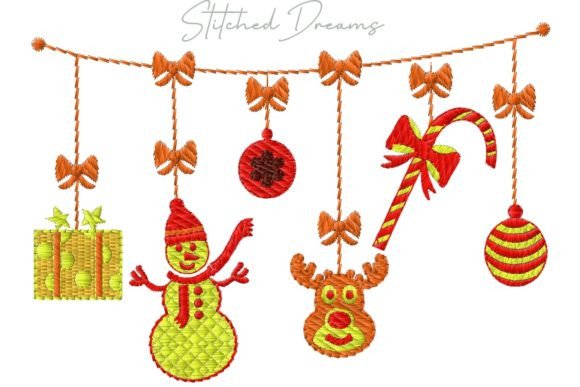
This week, I put the Christmas Toys design through its paces. The concept is simple yet evocative: a rope adorned with beautiful holiday ornaments, capturing the magic of the season in a linear, decorative layout. It promises to bring festive charm to various projects, but does it hold up in real-world application? Here is my honest assessment from the perspective of someone who needs reliable design assets for client work and personal craft business inventory.
First Impressions and Visual Flow
The first thing that strikes me about Christmas Toys is its horizontal flow. Unlike centered medallion designs, this layout mimics a garland or a string of lights, which immediately opens up specific placement opportunities. The visual personality is playful but structured. The "rope" element provides a strong baseline, ensuring that the hanging toys do not look like they are floating aimlessly. This structural integrity is crucial for maintaining clarity, especially when scaling the design down for smaller items.
The mood is undeniably nostalgic. It avoids the overly cartoonish look that can sometimes cheapen holiday embroidery, opting instead for a classic ornament aesthetic. For an Etsy seller or boutique owner, this balance is vital. You want a design that feels premium enough for a higher price point but approachable enough for mass appeal during the busy Q4 rush.
Real-World Application: The Tote Bag Test
To truly evaluate an embroidery file, you have to stitch it out. I chose to test Christmas Toys on a heavy canvas tote bag. This is a popular small shop product during the holidays, often used for gift giving or carrying party supplies. The canvas provided a stable base, allowing me to focus on how the stitches interacted with the fabric texture.
The result was impressive. The rope element stitched out cleanly, creating a nice textured line that anchored the heavier ornament shapes. Because the design spreads horizontally, it utilized the width of the bag beautifully without overwhelming the vertical space. If you are creating a personalized gift or a handmade product for a local market, this design works exceptionally well on tote bags, aprons, and even tea towels. The linear nature allows you to add names or dates above or below the garland without cluttering the composition.
Apparel and Soft Goods Considerations
I also tested the design on a fleece sweatshirt. Sweatshirt embroidery can be tricky due to the pile of the fabric and the stretch of the material. Here, the performance of Christmas Toys depended heavily on my choice of stabilizer. I used a cut-away stabilizer to prevent distortion. The design held up well, though I noticed that the finer details of the smaller toys required careful tension adjustment. If you are working with custom apparel, particularly knit fabrics, always prioritize stability over speed.
For baby embroidery projects, such as onesies or burp cloths, this design is a strong contender. However, I would recommend resizing it to ensure the stitch density is not too high for delicate skin and thin fabrics. A lighter touch is always better for infant items.
Technical Performance and Stitch Quality
From a technical standpoint, the digitizing appears thoughtful. The transition between the rope and the hanging elements uses secure connecting stitches that minimize jumps and trims. This is a huge time-saver for production runs. Whether you are doing a single embroidered patch or a batch of twenty hats, fewer trims mean faster turnaround times.
The use of satin stitch for the outlines and fill stitch for the larger ornament bodies creates a nice contrast in texture. This variation adds depth to the finished product, making it look more expensive than a flat, single-stitch-type design. However, this also means you need to pay attention to your thread colors. High contrast between the rope and the toys helps define the shape, while subtle gradients within the ornaments can add a realistic shine.
One area to watch is the stitch density in the center of the larger toys. On thick fabrics like denim or wool coats, this is rarely an issue. But on thinner materials, such as a cotton shirt or a silk pillow cover, you might experience some puckering if you do not use the appropriate backing. Always test on scrap fabric first. I cannot stress this enough: what looks good on screen can behave very differently under the needle.
Where to Use Caution
While Christmas Toys is versatile, it is not a one-size-fits-all solution. There are specific scenarios where you should proceed with caution:
- Small Hoop Sizes: If you are using a 4x4 hoop, you will likely need to resize the design significantly. Be careful not to shrink it so much that the details merge into a blob. Check the smallest elements before committing to the final stitch-out.
- Curved Surfaces: Stitching this on a cap requires careful hooping. The horizontal line must follow the curve of the crown perfectly, or the design will look warped. Use a cap frame and consider splitting the design if necessary, although this particular layout works best as a single unit.
- Dark Fabrics: If you are stitching on black or navy, ensure your thread colors pop. A printable mockup can help you visualize this, but nothing beats a physical test. Sometimes, adding a white underlay or outline can help define the edges against dark backgrounds.
- Stretchy Fabrics: Avoid using this on highly elastic materials without substantial stabilization. The weight of the fill stitches can cause the fabric to gather around the design.
Commercial Viability and Branding
For those running a craft business, the commercial potential of Christmas Toys is high. It fits seamlessly into the holiday niche, which is one of the most profitable seasons for handmade goods. It works well for commercial embroidery projects where clients want something festive but not overly religious or specific. It is neutral enough for corporate gifts yet charming enough for family presents.
When listing this on platforms like Etsy, use clear photos that show the texture of the stitches. Buyers of digital embroidery file products or finished goods want to see the quality. Highlight the versatility: mention that it works on tote bags, pillows, and apparel. This broadens your customer base and increases the perceived value of the design.
Final Verdict and Designer Notes
In conclusion, Christmas Toys is a solid addition to any holiday design library. It balances aesthetic appeal with practical stitchability. It is not just a pretty picture; it is a functional embroidery project component that can elevate your seasonal offerings.
Before you start stitching, keep these final tips in mind:
- Check Licensing: Confirm whether the license allows for unlimited sales of finished items or if there are restrictions. This is critical for small business merchandise.
- Test Thread Colors: Experiment with metallic threads for the ornaments to add extra sparkle, but ensure your machine can handle them without breaking.
- Inspect Details: Zoom in on the digitized file to check for any unnecessary jump stitches or dense areas that might need editing in your software.
- Mockups Matter: Use the design in digital mockups to plan your marketing materials before you even stitch the first sample.
If you are looking for a reliable, festive design that performs well across various fabrics and products, Christmas Toys is worth your time. Just remember to respect the technical requirements of embroidery, and you will create beautiful, professional-quality items that customers will love.